A few days ago we released the Sonoria sound toy for iPhone. Here is the information page for Sonoria.
The toy is on sale on the App store and we decided to distribute the code and this little tutorial so that anyone could be able to make his/her own sound toy for the iPhone. So, if you enjoy the tutorial and it is useful to you, please consider buying the Sonoria sound toy on the App Store by clicking here.
So, let’s begin.
Sonoria is a simple sound toy: you touch the screen and some samples are used to generate sounds at varying parameters according to where you touch the screen and how you tilt the phone.
Make sure you have Apple’s SDK for iPhone installed and updated.
The software uses the Cocos2D library. So go ahead and follow the instructions found here to download and install the Cocos2D library.
Make sure you have the Cocos2D project templates correctly installed and working by following one of the tutorials found on the library’s website.
Let’s start the Sonoria app development: from Xcode create a new project and, in the Cocos2D section choose Cocos2D Application (we won’t be using any physics in this tutorial).
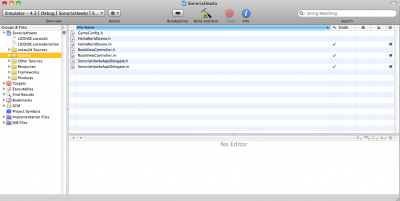
You should have these files/folders created:
We will throw away the HelloWorldScene class that comes with the standard project, and make a new one.
So, from the XCode file browser select the HelloWorldScene .m and .h and delete them. Select the “Also move to Trash” option to completely remove them.
We will now add our main scene, and we will call it MainScene: click on your “Classes” folder and select the Add new file from your file menu and, from the User Templates, select the Cocos2D set of templates, and choose to make a CCNode class: in the dropdown menu at the bottom of the interface, choose to make a CCLayer subclass. Click “Next” and when prompted name the file MainScene.
The scene that will be created will be pretty empty, so let’s add some standard components to it, so that it starts working.
Let’s add in the MainScene.h file the definition of the initializer for this class:
+(id) scene;
And then let’s move to the MainScene.m file to add its complete implementation:
+(id) scene
{
     // 'scene' is an autorelease object.
     CCScene *scene = [CCScene node];

     // 'layer' is an autorelease object.
     MainScene *layer = [MainScene node];

     // add layer as a child to scene
     [scene addChild: layer];

     // return the scene
     return scene;
}
-(id) init
{
    if( (self=[super init] )) {

         self.isTouchEnabled = YES;
         self.isAccelerometerEnabled = YES;
         CGSize winSize = [[CCDirector sharedDirector] winSize];
         CCSprite *background = [CCSprite spriteWithFile:@"sc1.png"];
         background.position = ccp(winSize.width/2, winSize.height/2);
         [self addChild:background];
         [[UIAccelerometer sharedAccelerometer] setUpdateInterval:1/60.0f];
         [UIAccelerometer sharedAccelerometer].delegate = self;
         yAcceleration = 0;
         [self schedule:@selector(update:) interval:0.1f];
     }
     return self;
}
Let’s go over the important points of these two methods:
The first one is very simple and just creates and empty scene, initializes a MainScene object (which will be a layer for the scene, since it is a CCLayer subclass) and adds it to the scene itself, then returning the scene to the caller.
The second method is the actual initializer. First it invokes the superclass initializer and, if everything’s ok, it starts to initialize all the components we need in the scene.
With these two commands:
self.isTouchEnabled = YES;
self.isAccelerometerEnabled = YES;
we make sure that the touch and accelerometer features of the iPhone will be available from this scene.
To complete this feature, we have to add support for the two protocols that rule how we get alerted of touch and accelerometer events in the iPhone environment. From the MainScene.h file, let’s add the support for the protocols that are needed to be alerted when the user touches the screen or tilts the phone by transforming the first line of code after the imports:
@interface MainScene : CCLayer <CCStandardTouchDelegate, UIAccelerometerDelegate>{
To complete this addition we will need to add the support for the methods that are called by these protocols to effectively alert us of these kinds of events. So let’s move back to the MainScene.m file and add these in as well:
- (void)ccTouchesBegan:(NSSet *)touches withEvent:(UIEvent *)event
{
}
- (void)accelerometer:(UIAccelerometer *)accelerometer didAccelerate:(UIAcceleration *)acceleration
{
}
We will get back to these methods in a bit, to fill them with code. Now let’s move back to our initializer, to understand what the other statements mean.
With this statement:
CGSize winSize = [[CCDirector sharedDirector] winSize];
We will get the screen size, that we’ll use to place the background image on screen. For the background, create a 320×480 image, save it in PNG format with the name “sc1.png”, click on the Resources folder of your XCode project and select “Add existing file”, choosing the image from the file selector (Note: remember to set the “Copy to folder” option at the top of this dialogue if the files you are adding are not already in the project’s directory). Now let’s add the image to the screen as background:
CCSprite *background = [CCSprite spriteWithFile:@"sc1.png"];
 background.position = ccp(winSize.width/2, winSize.height/2);
 [self addChild:background];
These three statements load the image as a Cocos2D Sprite, set its background position using the screen coordinates we found in the previous statements, and add the image to the CCLayer with the addChild message.
The next two statements configure the accelerometer:
 [[UIAccelerometer sharedAccelerometer] setUpdateInterval:1/60.0f];
 [UIAccelerometer sharedAccelerometer].delegate = self;
the first one sets its update interval (how often our method will be called) and the second one states that this class (self) is the delegate (where we will find the accelerometer: method to be called).

We will use three variables to store accelerometer status: xAcceleration, yAcceleration and zAcceleration. We will actually use only one in this example, along the Y axis, so let's initialize it:

yAcceleration = 0;
We will also need to define these three variables in our class: let’s go back to our MainScene.h file for a second and let’s add the three variables definition:
float yAcceleration,xAcceleration,zAcceleration;
As last step (for now) of the initializer, we will setup a scheduled method to be called: we will use it later to update our graphics:
[self schedule:@selector(update:) interval:0.1f];
And let’s add this method (for now empty) to the MainScene.m file:
-(void) update:(ccTime)deltaTime
{
}
Next step: let’s setup the sprites that will appear when we touch the screen. For this we will use a series of variables: let’s define them in the MainScene.h file:
NSMutableArray *sprites;
NSMutableArray *animFrames;
These two mutable (meaning that they can be changed at runtime) arrays will store the sprites currently on screen and the frames that make up their animations.
To create our sprite animations we will use the Sprite Sheet technique: we will create a series of animation frames (for example by using Flash and creating a timeline animation of our sprite and then choosing “Export movie” from Flash, and exporting in PNG sequence), and we will use a software like THIS to load all our animation frames, use the “Arrange” feature (for example “by Name and Size”) to lay them all out on the sheet, and save by exporting both the coordinates and texture file (from the File menu in the application). This will produce a large image file (in this example it is called “texture.png”) and a text file with “.plist” extension that describes the coordinates at which the various animation frames can be found. Load both files in your project (keep it clean and load them into the Resources folder) by using the Add–>Existing Files from the File menu in XCode and let’s use them into the code.
Let’s add the sprite initialization code to the init method of our MainScene.m file:
CCSpriteSheet *sheet = [CCSpriteSheet spriteSheetWithFile:@"texture.png" capacity:50];
 [self addChild:sheet];
These first two statements actually load the texture sheet image and state that it will contain maximum 50 animation frames (adjust for your animation).
[[CCSpriteFrameCache sharedSpriteFrameCache] addSpriteFramesWithFile:@"texture.plist"];
This other statement loads the plist file to let the system know where to find the coordinates.
And now let’s preload our sprites with their animations, so that we will have a better performance: let’s initialize the array that will store them (we decide to have, let’s say, a maximum of 20 sprites on screen at a single time)
sprites = [[NSMutableArray alloc] initWithCapacity:20];

 And let's actually load the frames into the array:
 animFrames = [[NSMutableArray alloc] initWithCapacity:50];
 for(int i = 1; i <= 50; i++) {

 CCSpriteFrame *frame = [[CCSpriteFrameCache sharedSpriteFrameCache] spriteFrameByName:[NSString stringWithFormat:@"sprito%04d.png",i]];
 [animFrames addObject:frame];
 }
in the example the animation frame images (the ones we saved from Flash as PNG files by exporting the movie) were called like “sprito0001.png”, “sprito0002.png” and so on, adjust the file name generated in the loop according to the name of yoru files (the names of the files are also used in the texture.plist file as name for animation frames).
In our application we will use a customized sprite class to handle our sprites: since in Sonoria the sprites look like little ghosts, this class is named “Fantasma”. Let’s add it to the project by doing File–>Add–>New file and choosing a CCNode from the Cocos2D templates, and CCSprite from the dropdown menu to set subclassing.
This class will be very simple: it will add an integer counter to a regular Cocos2D sprite, and this counter will be used to fade out the spites, to obtain a ghostly effect. So let’s add the variable and property definition to the Fantasma.h class
@interface Fantasma : CCSprite {

 NSInteger contatore;
}
@property (nonatomic,assign) NSInteger contatore;
@end
and let’s synthesize this property into the Fantasma.m file
@implementation Fantasma

@synthesize contatore;

@end
Now we can go back to our MainScene.m file and instantiate our Fantasma objects when the user touches the screen.
We will add this code to the ccTouchesBegan method (see code comments for explanations):
NSEnumerator *enumerator = [touches objectEnumerator];
 id touch;
 BOOL found = NO;
// we loop through all the touches
 while ((touch =  [enumerator nextObject]) && ! found) {
//if the touch is on the EAGLView (the background) and if there are no more than 20 sprites aready on screen...
if ( [[touch view] isKindOfClass:[EAGLView class]] &&[sprites count]<20) {
// YES! i found it
found = YES;
//instantiate a Fantasma object
Fantasma *sprite = [Fantasma spriteWithSpriteFrameName:@"sprito0001.png"];
//set its position where the touch is
sprite.position = ccp( [touch locationInView:[touch view]].x , 480-[touch locationInView:[touch view]].y );
//initialize its counter, to setup its fadeout
sprite.contatore = 60;
//instantiate a spritesheet so that the sprite can be animated
 CCSpriteSheet *spritesheet = [CCSpriteSheet spriteSheetWithFile:@"texture.png"];
 [spritesheet addChild:sprite];
 [self addChild:spritesheet];
//Use Cocos2D animation action, running it on the sprite, to automatically animate it using the frames in the spritesheet
CCAnimation *animation = [CCAnimation animationWithName:@"dance" delay:0.05f frames:animFrames];
 [sprite runAction:[CCRepeatForever actionWithAction: [CCAnimate actionWithAnimation:animation restoreOriginalFrame:NO] ]];
//add the sprite to the screen
[sprites addObject:sprite];

 }
 }
So, as soon as a touch is made (and, as we said, if not more than 20 sprites are already on screen) a new sprite is added where the user touches the screen, and its animation is started.
And now let’s fill the update method we created earlier to fade out our sprites and to remove them from screen when they become invisible. Let’s add this code to the update method (see code comments for info on how it works):
// lets browse through all the sprites that we have generated up to now
for (int i = 0; i<[sprites count]; i++) {
// each object is a Fantasma instance
 Fantasma *f = (Fantasma *) [sprites objectAtIndex:i];
// let's decrease its counter
f.contatore--;
// let's set its opacity--> contatore=0 means invisible, 60 means fully visible
 [f setOpacity: 255.0f*(float)f.contatore/60.0f ];
//if the counter goes to zero
 if (f.contatore==0) {
//remove the sprite from the list
 [sprites removeObjectAtIndex:i];
 }
 }
Let’s now complete (almost) the MainScene class by adding the code that takes care of updating the Accelerometer status:
- (void)accelerometer:(UIAccelerometer *)accelerometer didAccelerate:(UIAcceleration *)acceleration
{
 yAcceleration = acceleration.y;
 xAcceleration = acceleration.x;
 zAcceleration = acceleration.z;
}
As you can see we just store the accelerometer status: we will use it a bit later.
Let’s start adding our scene to the main screen of the application, to see how it works.
Let’s go to our AppDelegate class (in the example it is called SonoriaHowtoAppDelegate) and in the SonoriaHowtoAppDelegate.m file let’s replace the HelloWorldScene.h import (remember? we deleted it!) with our MainScene.h.
Now browse down the AppDelegate class until you find this statement:
[[CCDirector sharedDirector] runWithScene: [HelloWorld scene]];
and change it to this
[[CCDirector sharedDirector] runWithScene: [MainScene scene]];
Then go to the GameConfig.h file and change the GAME_AUTOROTATION like to make it like this
#define GAME_AUTOROTATION kGameAutorotationCCDirector
(we want to delegate the game director to take care of screen rotation)
Now, back to the AppDelegate, remove these few lines:
#if GAME_AUTOROTATION == kGameAutorotationUIViewController
 [director setDeviceOrientation:kCCDeviceOrientationPortrait];
#else
 [director setDeviceOrientation:kCCDeviceOrientationLandscapeLeft];
#endif
and replace them with this one:
[[CCDirector sharedDirector] setDeviceOrientation:CCDeviceOrientationPortrait];
(this is done for simplicity in this tutorial: we are actually switching off autorotation: you can use the functionalities which we are disabling to provide an autorotation experience)
Now choose Build and Run from XCode menus to test things out.
Ok, perfect! You should see little ghosts popping up over the background when you touch the screen.
Now, since we’re making a sound toy, let’s add sound!
To do this we will add a class (File–>Add–>New File–>subclass NSObject) called SoundContainer which is a singleton. Its interface is like this:
#import <Foundation/Foundation.h>
#import "SimpleAudioEngine.h"

@interface SoundContainer : NSObject {

 int activeLibrary;
 NSMutableArray *soundPaths;

}
+(SoundContainer *)sharedSoundContainer;

-(void) setup;
-(void) loadLibrary: (NSInteger) whichLibrary;
-(void) playAtX: (float) xCoord y: (float) yCoord inScreenWithRect: (CGRect) bounds withAccelerationX: (float) xacc;
@end
A singleton is a class with a controlled instantiation (it usually instantiates only once and all other classes use the same instance, thus the name). We will use it to centrally control all the sounds produced by our sound toy.
I have setup a class that is easy to expand (for example if you’d like to add features like “buy additional sound libraries for your sound toy” in your personalized applications).
So the class is organized to contain a library of sounds which are composed by the sounds which you add as wave files (.WAV) to your project. Sound files are named “sound-[library-number]-[sound-number].wav” so, for example the file “sound-0-2.wav” is the third sound of the first library (numbers start at 0). Libraries contain 8 sounds (numbered 0 to 7).
The sharedSoundContiner property is used to access the singleton instance.
the loadLibrary method is used to initialize a library (remember to load sounds with properly named files into your project).
the playAt method is used to play a sound according to where the user touched and according to the current accelerometer status.
So let’s add the class to our application by importing it into our AppDelegate. Add this statement to the .h file of the AppDelegate:
#import "SoundContainer.h"
And then let’s initialize the SoundContainer by adding these lines to the .m file of the AppDelegate, just before the runWithScene method invocation:
SoundContainer *sc = [SoundContainer sharedSoundContainer];
 [sc setup];
 [sc loadLibrary:0];
Thus initializing it and loading the library number 0.
Now let’s add the call to the platAt method. Sounds should be played when the user touches the screen, so we will move back to our MainScene.m file. First of all, add the import statement for SoundContainer to this file, as well (the same as the one we added to the AppDelegate).
And then let’s add the playAt method invocation into the touchesBegan method, to make the sound play based on touch:
Just after adding the sprite to the screen add the following line:
[[SoundContainer sharedSoundContainer] playAtX:sprite.position.x y:sprite.position.y inScreenWithRect:[[UIScreen mainScreen]applicationFrame] withAccelerationX: xAcceleration];
So, when we touch the screen and generate a new sprite, a new sound is generated as well.
Let’s take a look at what goes on in the playAtX method:
float percY = 100.0f * yCoord / (bounds.size.height-32);
 float percX = 100.0f * xCoord / bounds.size.width;

 int quale = 0;

 for (float i=0; i<8; i++) {

 if (percY>=i*12.5f && percY<(i+1)*12.5f) {
 quale = i;
 i = 9;
 }

 }

 [[SimpleAudioEngine sharedEngine] playEffect:[NSString stringWithFormat:@"sound-%i-%i.wav",activeLibrary,quale]  pitch: percX/100.0f pan: -0.5f*xacc gain: 0.6f ];
The percX and percY values are used to calculate a percentage corresponding to the position of the touch onto the screen (for example 0% is to the left and 100% is to the right).
The Y percentage is used to select a sound (so if you touch along the Y axis of the screen you will use different sounds) in the for loop.
the last statement uses all parameters to finally generate the sound: the X percentage is used to control pitch and the acceleromter status is used to control panning.
To play the sound the playEffect method of the SimpleAudioEngine offered by the Cocos2D library is used.
The library related functions of this class are used to preload the sounds, to obtain better performance: the code is really simple (a loop on filenames) so we won’t get into details on that: browse the code and feel free to ask questions.
So: build again, and enjoy your sound toy!
HERE YOU CAN DOWNLOAD THE SOURCE CODE AND XCODE PROJECT USED IN THIS TUTORIAL
And remember to support free software and open knowledge: if you found this tutorial useful in any way, please condiser buying the Sonoria sound toy for iPhone on the App Store or supporting Art is Open Source by making a small donation using this button below:
![[ AOS ] Art is Open Source](https://www.artisopensource.net/network/artisopensource/wp-content/uploads/2020/03/AOSLogo-01.png)


